Hey y’all!
Many people have been asking me how to apply for a DGCA Computer Number (CN) so I thought I’d write an article detailing the steps.
For many future captains, the journey to the cockpit begins with preparations for the 3 main DGCA exams – Nav, Met, & Regs – and in some cases, other papers like Tech Gen., Tech Specific, etc. However, to give the attempts for these exams, you’ll first need a Computer Number, allotted to you by the DGCA. Most people who have a CN today know the pain of having to reapply multiple times due to their application being rejected for various “shortfalls”.
The “trick” in getting your application approved on the first try requires that you follow the DGCA’s requirements precisely – that means you’ll have to dot all i’s and cross all t’s. Below, I’ve written the step-by-step process along with useful links to meet the DGCA’s requirements to be allotted a CN.
Note that all the information for the steps listed below come directly from the User Manual (Issue 1, Rev. 3 – Oct. 2021) that can be downloaded from Pariksha DGCA by clicking on USER MANUAL > Flight Crew MANUAL.
Before you start, please read through this entire article first as well as the User manual from the Pariksha site. Feel free to comment below if you have any questions!
Let’s get started!
Step 1: Photograph
Go to a photo studio that does “5-minute passport photos” and show them these requirements. Ensure that they understand the below requirements and confirm their total cost they’ll charge for your photos. Most photo studios will charge the same as a regular passport photo, but some may charge more because they must resize the photo.
Here are the requirements:
- White background without borders (Ensure that your top is a dark color – does not need to be black!)
- Photo size – 45 mm height & 35 mm width (Ensure that your face covers ~ 70% of the printed photo)
- Matt finish (Ask for the photo to be printed with Matt finish – like in UK/Schengen visa)
- Image file size should be less than 70Kb and in JPG/JPEG format.
Make sure to get a soft copy of your photo (in JPG/JPEG format) with the above requirements. Additionally, get a soft copy of the photo with same requirements as above, except the file size need not be 70Kb. Also get regular passport-size photos (for the near future) and a soft copy of it as well.
Alternatively, you can use the following steps to edit/resize the photo yourself:
- Upload your photo to this site: https://imageresize.me/
- From the size drop-down menu, select “3.5 x 4.5 cm (207px x 266px)”
- Do not click on the “Crop” or “Signature Scan” buttons
- Drag your photo until your face is within the highlighted box
- Drag one of the corners to increase/decrease the size of your photo so your face covers ~70% of the highlighted box (Make sure not to distort the image!)
- From the download drop-down menu, choose “100kb” first and click on the “JPG” button next to it
- Once it’s downloaded to your computer, right-click on the image file and click on properties.
- Check if the “Size” of the image is under 70Kb. If not, go back to the website and select the “50Kb” option instead, to download a more compressed image.
Note: If you decide to do it yourself, be careful not to distort the image and make sure that your edited image meets the DGCA requirements.
Here’s a sample photo that I resized to the above specifications using the Image Resize site:

Step 2: Signature
Go to a xerox/scan center and get a white, clean sheet of A4 paper. On it, place your signature (if you make multiple attempts, make sure that the signatures are spaced out) and ask them to scan it with high resolution settings. Ensure that the scanned image has no blue/green tinting effect in the edges, no smudges, no marks/lines, no shadows, etc. Save this image on your pen drive.
Here are the requirements:
- White background without borders (use black or blue ink for your signature)
- Image size – 20 mm height & 45 mm width
- Image file size should be less than 20Kb and in JPG/JPEG format.
On your personal computer, follow these steps to resize the image according to the requirements above:
- Upload the scanned image to this site: https://imageresize.me/
- From the size drop-down menu, select “Custom Size”
- Enter width as “266 px” and height as “118 px”
- Do not click on the “Crop” or “Signature Scan” buttons
- Drag your photo until your signature is well within the highlighted box
- Drag one of the corners to increase/decrease the size of your signature (Make sure not to distort the image!)
- From the download drop-down menu, choose the highest size available (eg: 5Kb) and click on the “JPG” button next to it.
- Once it’s downloaded to your computer, right-click on the image file and click on properties.
- Check if the “Size” of the image is under 20Kb. If not, go back to the website and select the next highest option instead, to download a more compressed image.
Note: Be careful not to distort the image and make sure that your edited image meets the DGCA requirements.
Here’s a sample signature that I resized to the above specifications using the Image Resize site:

Step 3: Documents
While you’re at the xerox/scan center for the above step, also scan the following documents (in PDF format) and get a color xerox of each:
- 10th Marksheet & Pass Certificate
- 12th Marksheet & Pass Certificate (Ensure you have Maths & Physics)
- 10th Board Verification Certificate
- 12th Board Verification Certificate (Ensure you have Maths & Physics)
- Aadhaar card
- Passport (First and Last pages)
- Date of Birth Certificate (10th marksheet can be used for this requirement if it has DoB on it)
- Proof of Permanent Address (Aadhaar, passport, etc. can be used for this requirement)
- Any additional documents you think you may need (eg: name change proof, Association of Indian University certificate, etc.)
The above list is not exhaustive, and I strongly recommend you read through the User Manual to ensure you are not missing out any documents.
Self-attest the xerox copies of the above documents and just to be safe, get the xerox documents notarized as well.
Now, you’ll likely have to compress the scanned pdf documents above to meet the file size requirements as follows:
200Kb
- 10th & 12th Pass Certificate
- Date of Birth Certificate
- 10th & 12th Board Verification Certificate
- 10+2 Equivalent Certificate
- Proof of Permanent Address
- Association of Indian University Certificate
- Aadhaar card
- Security Clearance Certificate
- Experience Certificate
- FATA Authorization Certificate
- Other Certificates
100Kb
- 10th & 12th marksheet
- Passport
- Visa
To compress the pdf documents, follow these steps:
- Upload your pdf document to this site: Compress PDF online. Same PDF quality less file size
(If you are having trouble compressing your pdf to 100Kb/200Kb with the above site, a good alternative is: Compress PDF - Compress your PDF document online) - Choose one of the compression options and click start
- Irrespective of what the website says regarding the new file size, download the document to your computer
- Once it’s downloaded to your computer, right-click on the pdf file and click on properties
- Check if the “Size” of the pdf document is under 100Kb/200Kb. If not, go back to the website and select the next highest compression instead, to download a more compressed pdf
- Repeat the above steps for all the documents.
If you passed your 10th/12th from Tamilnadu state board, read this to find out how to apply for a Board Verification Certificate: Apply for a Tamilnadu Board Verification Letter
Step 4: Account Creation
Now that you’ve done the groundwork, it’s time to apply for your CN. If you already have an account on Pariksha, you can skip to step 5 below.
- Go to the site: https://pariksha.dgca.gov.in/
- Click on “NEW Candidate Registration” under “Flight Crew”
- Read through the instructions, click on the checkbox to verify the same, and click submit
- Enter all the required details and click submit
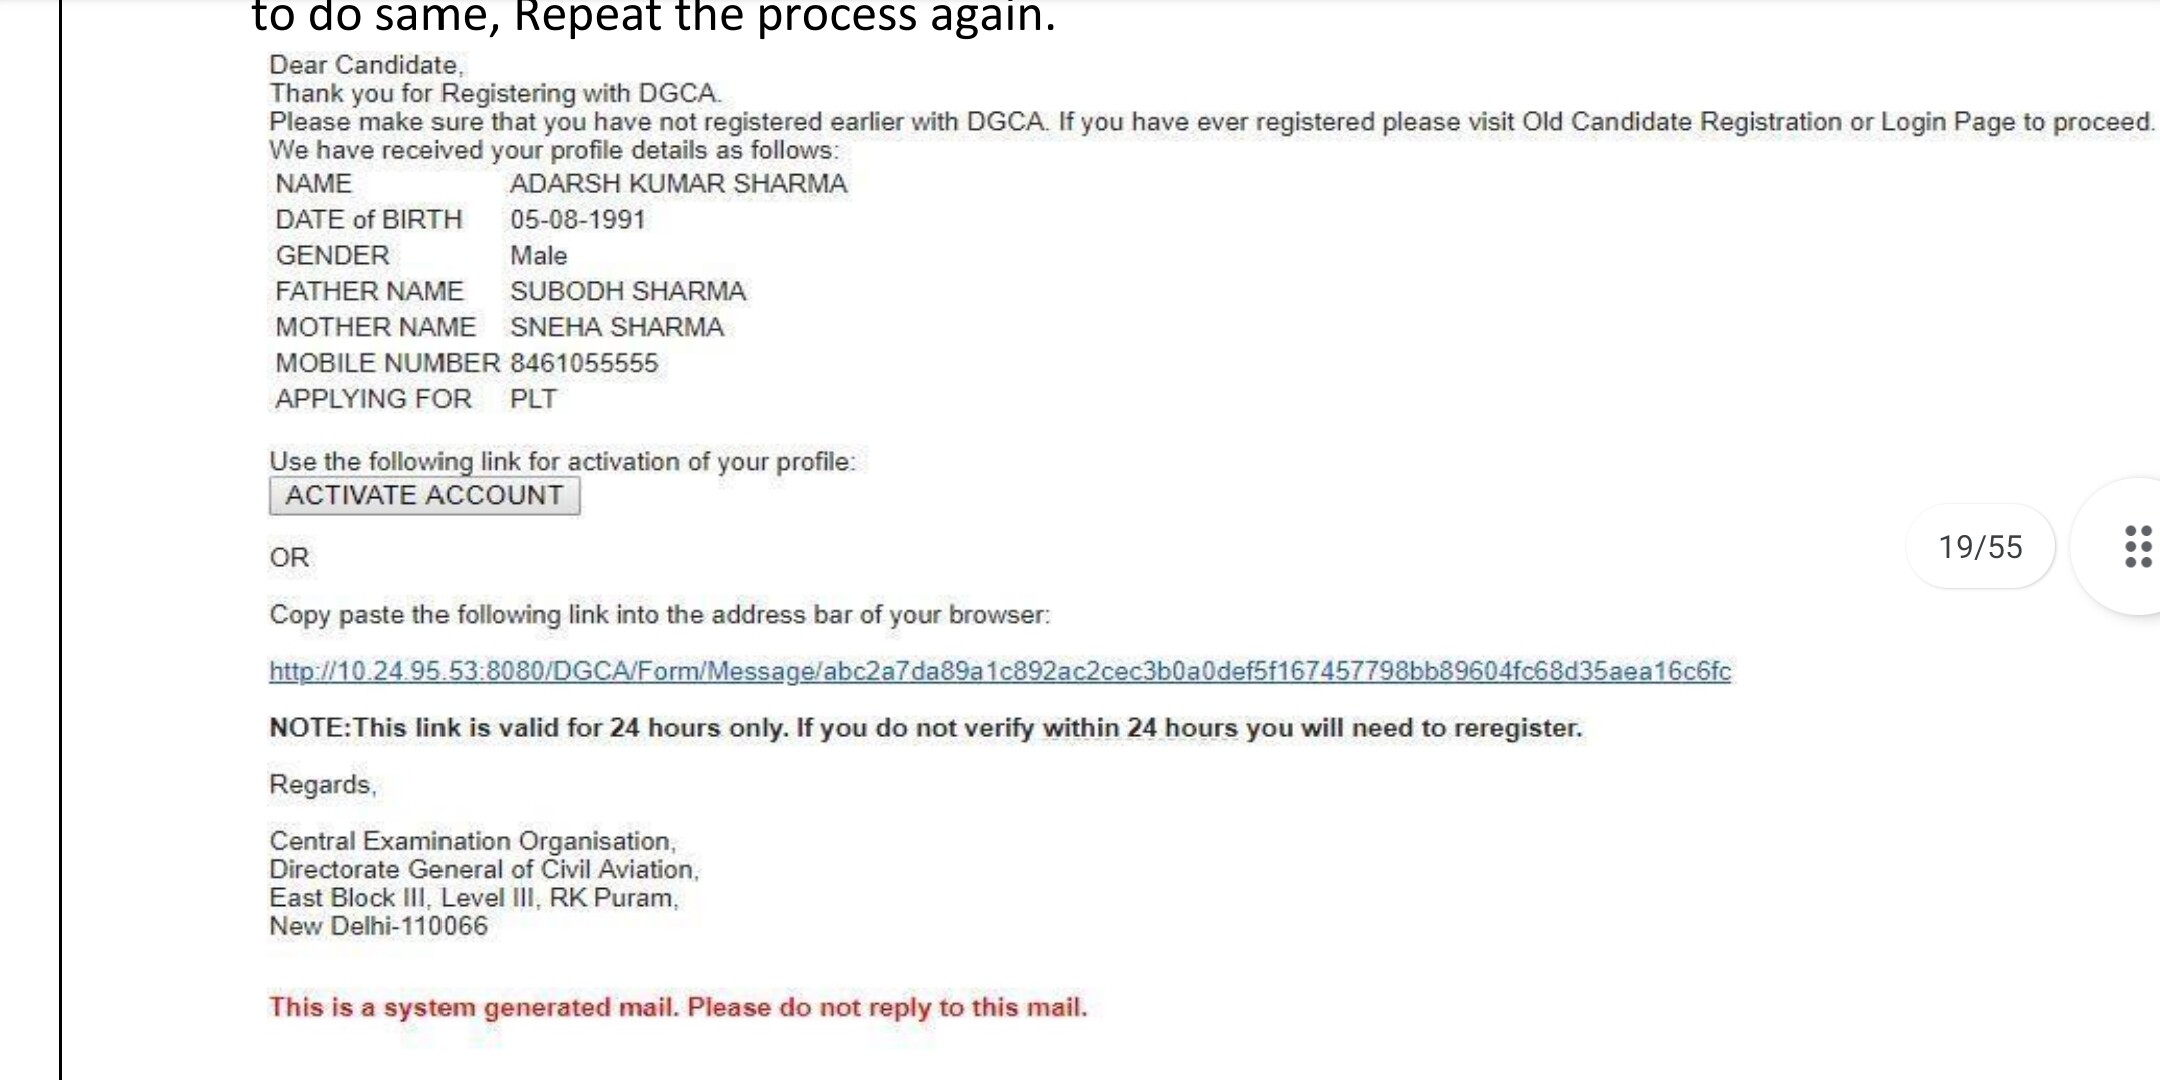
(Note that the email ID and phone number you enter here will be used for all further communication by DGCA Pariksha portal – this includes exam results, admit card details, etc.) - Now, you’ll have to verify the email address and phone number you entered through link/OTP.
- Once your account has been created, you can now go back to the Pariksha portal and click on “Candidate Login” to log into your account.
Step 5: CN Application (Online)
Note that the session will time out after a fixed period of inactivity, and you will be logged out. Therefore, I highly recommend you click on the save button periodically.
- Once you’ve logged into your account, fill in the rest of the required details.
(If you have specific questions regarding this step, confer the User Manual or comment below!) - Now, upload your documents in the appropriate fields and click submit
(If you receive an error when uploading the documents, it is likely that your file size/type does not meet the requirements.) - Review the details carefully to ensure that no mistakes have been made, then click submit.
(You will not be able to change the details on your application after this step!) - Note down your temporary ID and the address to which you must send the hard copy.
- A download of a PDF document will start automatically
(You’ll receive the same PDF document as an attachment to your email address)
Step 6: CN Application (Hard Copy)
You now have 10 days to have the hard copy of your application delivered to the DGCA office. Follow the below steps to prepare and send your hard copy application. Use blue ink when filling/signing the application.
- Take a color print out of the downloaded application form
- In section 9, place a tick mark in the appropriate column, for each of the documents
- Arrange your self-attested & notarized documents in the same order as the list above
(For points 1 & 2, applicant photograph & signature refer to your application form – meaning place your application form first, then other documents below it)
Fill in the declaration in section 10, and ensure that the signature matches your uploaded photo - Paste your photograph with Matt finish in the appropriate box, on the last page of the application form
- Go to a notary public and have them sign and stamp in section 11.
(Ensure that their stamp and signature partly cover the photo but DO NOT touch your face)
- Staple your application form and all the documents together (in order)
- Place them inside a transparent A4 size sleeve (like this one: )
- Place this sleeve inside a green, A4 size, cloth-lined envelope (like this one: )
- Seal the envelope and write the TO and FROM address on the front
- TO address – the address you copied down after submitting online application
- FROM address – your home address, as filled out in the application
- Post the envelope from an “India Post” office ONLY.
That’s it!
You’ll receive an email confirmation when the DGCA office receives your hard copy application. If you’ve followed the above steps and have made no mistakes, you should receive an email with your computer number within 30 to 45 days! If you haven’t received your computer number within 30 days, you can raise a support request through the Pariksha portal.
If you have any questions, find errors in the above steps, or have a better way, please feel free to comment below!
Good luck! ![]()
IMPORTANT DISCLAIMER: The above “steps” are my opinion only. I may be wrong, or the information above may be outdated. I have only written down the steps above to help people who are not familiar with the process or have misunderstood some parts of the user manual. Following these steps do not guarantee that you will get your computer number.